Do this one trick to increase your traffic by over 30%

It Only Takes A Few Minutes to Increase Your Traffic by Over 30%

If you’re running any sort of blog it only takes a few minutes to rapidly increase the number of people visiting your posts.

This one trick only takes at most 20-30 minutes to implement and can have a HUGE impact on the number of incoming visitors.

What is this little simple trick?

…. wait for it…..

simply sign up for a Google Authorship account.

…. Stop Press~!

The pundits complain that Google is always trying to eliminate SEO and people who try to manipulate search engine results. So why the heck would they offer a service that helps you to increase your Search Engine rankings????

Well, signing up for the Google Authorship program doesn’t, directly, increase your rankings. Not immediately noticeable anyway.

Actually it’s still too early for me to tell. But so far, my blog rankings have remained the same.

However, the main (and enormous) advantage of Google Authorship is that each of your blog posts appears with your picture alongside in the Search Engine results.

How much impact can one little picture have???

Take a look at the image below. Which result stands out the most and which are you most drawn towards?

It’s obvious, isn’t it?

Would you believe that the result with the picture alongside is effectively stealing traffic from results that are ranked above it?

Even if your result isn’t the most relevant, or the biggest authority, you will attract visitors with a picture.

This is a simple marketing tactic that I’ve seen used on webpages a lot. Put pictures next to ads, and you will attract more clicks. Interestingly, Google abhors this kind of behaviour in its Adsense program. On the other hand it absolutely encourages it with Google Authorship.

Now just imagine that you have your picture placed beside each search result for every blog post on your website.

Even if, like me, your rankings don’t seem to improve much, you can still pick up a ton of additional traffic.

For example, if you’re ranked #3 for your targeted keyword, it’s now possible for you to pick up a bunch of traffic that normally would have clicked the first result. But the first result looks boring in the search results, yet it’s your picture that attracts the clicks.

It’s not really a question of substance. Because the picture isn’t really about adding value to the person who is searching for information. But it does allow YOU to STAND OUT in the search listings and adds a level of authority.

So what does it take to get this magnificent boost in search engine traffic??

Only, at most, 20 minutes of your time. All you need to do is register for a Google Authorship account, and then after about 2 weeks your beautiful face will be shown beside your listing(s) in Google.

Here’s a link to a tutorial on how to set up Google Authorship.

Good luck with this! I really expect that this tip will bring you a ton of extra traffic 

How To Comply With GDPR On Your Squeeze Page

comply with gdpr

In my last post here, I covered how to comply with the European regulations about General Data Protection on your blog.

In this post I’m going to look at how to comply with GDPR on your squeeze page or landing page.

Unlike the blog situation, if all you have is a squeeze page or landing page on a website, which may not even be your own (for example a Leadpages or Autoresponder site), then how to comply with GDPR has other ramifications.

As I’ve said before, I’m not legally entitled to give you advice on this and all I can do is sum up what I’ve read from people who have taken legal advice.

Obtaining consent to send people emails

Let’s look, first of all, at the difficult way and easiest way to obtain someone’s consent to send them emails.

A lot of people are playing safe by including a checkbox on their landing page that asks people to accept their Privacy Policy (and includes a link to a GDPR compliant Privacy Policy) before clicking the Submit button. (When I say ‘Submit button’ I’m talking about any button that someone has to click to submit their email address, no matter what text you use on that button).

Obviously this introduces further complications viz:

  1. It’s another obstacle to get over before people sign up (thus potentially reducing your opt-in conversion rate)
  2. It’s a complication to link the Submit button to the check box (in other words, how to you make the Submit button non-operational UNTIL the checkbox is ticked)

Note: you cannot show a ticked checkbox already. It has to be unticked and the user has to be able to tick it to give consent.

GetResponse has decided to comply with GDPR by providing the ability for you to include this checkbox when you use one of their landing page templates.

Use a ClickWrap method

The simpler way is to use what is called the ‘clickwrap’ method where you make the consent statement part of the clicking the Submit button process.

This is called ‘implied agreement’ because, simply by clicking the submit button, the user agrees to receive information from you.

Note: you have to tell the user what type of information they will receive from you in order to comply with GDPR on your squeeze page

This is a summation of the legal argument from the people at PageFair:

If a purpose is sufficiently specific and clear, individuals will know what to expect: the way data are processed will be predictable.’ The objective is to prevent ‘unanticipated use of personal data by the controller or by third parties and in loss of data subject control [of these personal data]

Basically, what you ask people to sign up for has to be specific, transparent, and predictable. People have to know what they’re signing up for — and sign up anyway.

Someone might not expect, for example, if they sign up for a free PDF to start getting daily emails and promotions from you.

Now the legal eagles amongst you might say this is skating on thin ice, and I’d agree with them.

But, consider this…

…the main thrust of GDPR is:

a) to protect the individual’s rights to the use of their personal data

b) to enable them to withdraw those rights at any time

c) to enable them to delete personal data you may hold about them at any time

If all you’re doing, on a squeeze page or landing page, is collecting someone’s email address (and, perhaps, their name) then you make it simple for them to withdraw their consent and delete personal data by allowing them to unsubscribe at the bottom of every email message you send.

This is what Aweber, who are sticklers for email compliance, have to say about this:

Another rumor floating around is that you need to add checkboxes to your signup forms in order to be GDPR compliant. Some are even calling these “GDPR-friendly signup forms.”

This is false. Checkboxes are not required, and are completely optional.

Nowhere in the GDPR does it state that you need to add checkboxes to your signup forms.

What it does say, however, is that you need to clearly communicate how you will be processing subscribers’ personal data, whether using a descriptive sentence or two, or using a checkbox, if you so choose.

Remember: you’re not a big company collecting personal data which may or may not be passed on to marketing departments or third parties to use. You’re just collecting an email address to send out useful information.

So, as long as you tell the person who is signing up what they can expect from you, there is implied consent when they hit the submit button. So here’s what I’m putting on my opt-in pages and pop-up forms:

Yes, I want to receive Peter’s incredible free resources, offers and training messages

And if you want to make doubly sure you have their consent, here’s what to do…

Single or Double Opt-in

One way to ensure that you have people’s consent to receive marketing messages from you is to enable double opt-in for subscribers.

When they opt-in to your list the first email they will receive in the Inbox is a message requesting confirmation that they want to receive information from you.

Here’s a sample from Aweber:
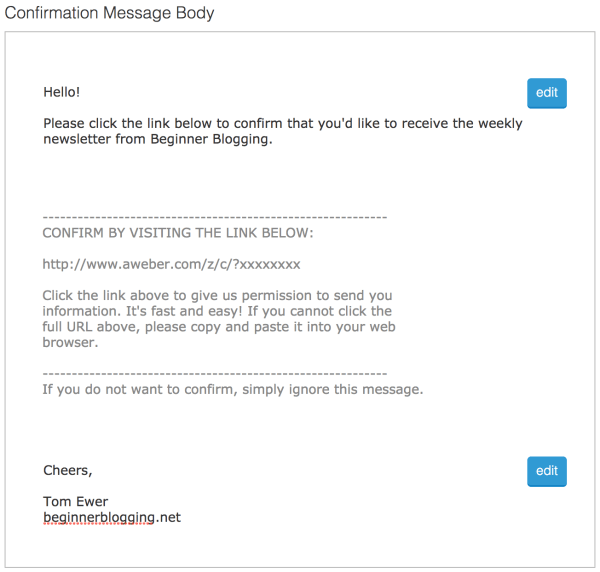
 

This is the standard Aweber text. However, it doesn’t give more explicit information about what the new subscriber is about to receive.

Here’s a more informative confirmation as suggested by YourWriterPlatform:

You’ll see that Kimberley is much more explicit about what the subscriber is going to receive. You don’t have to do this but it may help if someone ever challenges the consent they have given for you to send them information in your messages.

If you want to play safe, double opt-in is the way to do it.

How about single opt-in?

For the moment I’m sticking with single opt-in.

Why?

Because I’ve found that, with double opt-in, a lot of gmail users (and there are a LOT of gmail addresses used for opt-ins) don’t receive the confirmation email because it lands under their Promotions tab and they may not see it.

So, I’m keeping to single opt-in and skating the legal thin ice by covering myself with the implied consent on the squeeze page coupled to the stats that I have about my subscribers.

Both Aweber and GetResponse are fully GDPR compliant in the way they handle subscribers data, meaning that you can easily see the date a subscriber signed up and the form they used. This enables you to confirm that a subscriber did, indeed, consent to receiving your emails should there be any disagreement.

In your email messages

I strongly suggest that you use similar wording to mine in a footer in all your email messages.

Here’s mine and feel free to copy it and reword it for your own needs:

Reminder: This is NOT unsolicited mail

You are getting messages from me because you requested information about one of my educational videos or training products. As always with non-spam newsletters, you are free to unsubscribe at any time and you and your personal data will be removed from this list. There is a link to use at the bottom of this e-mail.

That would be a shame as you will no longer get free updates, tips and news from me if you decide to leave. And, as a subscriber, you can always reply to this email (yes, I’m a real person) whenever you need help.

I also include links, above this, to my Facebook page, Skype address and Blog page – the latter is especially useful as it contains my Privacy Policy and I tell people that, like this:

Add me on Facebook: https://facebook.com/peterjcomeau

Contact me on Skype: petercomeau

Website and Privacy Policy: https://petercomeau.com

By adding these to the footer of all your emails in your autoresponder (and I suggest you set up a Template to automate this) you are covering yourself against Spam and GDPR complaints with every message you send.


How To Comply With GDPR On Your Blog

gdpr-compliance-bloggers

What is the GDPR policy and how to comply with GDPR on your blog?

GDPR stands for General Data Protection Regulation. It is legislation to protect the privacy of EU citizens, particularly with regard to the way personal data is collected and stored. In this article I’m going to show you how to comply with GDPR on your WordPress blog.

If you have visitors to your websites or squeeze pages from EU countries then there are things that you need to do to comply with the requirements of GDPR before 25 May 2018.

Now don’t panic!

If you are just collecting email addresses and building a list in an autoresponder then a simple consent statement on your opt-in pages and in the footer of your emails may be all you need.

Some people are recommending using a check box and statement on squeeze pages but this makes the whole process very cumbersome and may not be entirely necessary. I’m not legally entitled to advise you on this but I can refer you to this legal argument that indicates that it isn’t, strictly, required here:

do my signup forms need a consent checkbox - how to comply with GDPR

The other method, and this is implicitly the correct way to obtain someone’s consent, is to use double opt-in. Remember that, if you do this, you can’t withhold whatever it is that the subscriber has signed up for even if they don’t consent.

So you should always take people to your download page whether or not they consent to receive messages from you. Again, it’s a messy way of doing things and I’m personally not doing this but sticking with single opt-in.

For more information on GDPR compliance on squeeze pages, I’ve gone into it in more depth here:

comply with gdpr

Now, if you have a blog and you’re collecting email addresses there, whether it’s on a contact form, using squeeze pages, pop-ups and so forth, or even in comments, then you need to update your privacy policy.

And if you’re using cookies at all, and remember that Facebook Pixels, Google Analytics and other trackers do place cookies, or if you are running affiliate promotions, then you need a cookie statement too.

That’s a little bit more complicated, which is why I’m showing you how to comply with GDPR in this video:

[page_section image=’https://petercomeau.com/wp-content/uploads/IMac-full-720.png’ textstyle=’light’ position=’default’ padding_bottom=’on’ padding_top=’off’ img_static=’off’ fullheight=’on’]

[responsive_video type=’youtube’ hide_related=’1′ hide_logo=’1′ hide_controls=’0′ hide_title=’0′ hide_fullscreen=’0′ autoplay=’1′]https://www.youtube.com/watch?v=fqBGtPIU5RE[/responsive_video]

[blank_space height=”250px”]

[/page_section]

Watch the video to see how you can use a couple of free plugins for WordPress blogs that will give you GDPR compliance for personal, I.e, non-commerce, WordPress blogs.

Hope you find this useful

Read more about GDPR compliance on your squeeze pages here: how-to-comply-with-gdpr-on-your-squeeze-page/

You may also want to upgrade your WordPress blog to https:// – see how to do that here

How To Convert Your WordPress Blog To HTTPS

convert your wordpress blog to https

I’ve just been converting all my sites to HTTPS, including my WordPress blogs. Convert your WordPress blog to HTTPS isn’t easy, on the face of it. I found a myriad of instructions about convoluted ways to do it, including editing the htaccess file and then converting all your links, including image links, video links, links for attachments, internal links and so on. Urrggh!

If you think I’m going to go through all that for each of my blogs you’ve got another thing coming!

So, I had to find a quicker way, and I did. And I’ll show you how you can do it in a minute…

…but, first, why bother?

What’s so great about https:// and why should you change anything?

HTTP (Hyper Text Transfer Protocol) was set up as the default code for site pages at the beginning of what we now call the Internet. Initially, it allowed for links to other pages and sites within the page text and, over the years, has grown into a style of programming code that makes site pages visually entertaining and informative.

However, there are no security protocols within HTTP. Basically, http:// pages are wide open to all sorts of abuse. And you’ll probably have seen Warnings when you’ve accessed some sites, recently, with Google trying to keep you away from sites that might ‘steal your personal info’.

This is going to become more prevalent, especially for sites which collect information such as email addresses and credit card details (for example if you have a squeeze page on your site or sales page with a buy button).

Even more worrying is that Google has announced that it has started giving ranking advantage to sites which have HTTPS. So, if you’re using your blog for SEO purposes (and who isn’t?), you’ll want to convert your wordpress blog to https://

Using HTTPS (S=Secure), computers agree on a ‘code’ that is scrambled so that no-one else can read that code. This is set up through an SSL (Secure Sockets Layer) to send the information back and forth.

To do this your domain must have an SSL certificate in place. Thankfully cPanel has started adding basic SSL to domains automatically and most web hosts will already have them in place (if you haven’t been notified of this, contact your web host to see).

Note: if you are running ecommerce on your site, you may need a higher rated SSL certificate. Domain providers like GoDaddy and Namecheap offer these, as do many web hosting services.

How to convert your WordPress blog to HTTPS

Right, now that you understand the benefits of https:// and, hopefully, have an SSL certificate installed on your site, here’s the quick and easy way to convert your WordPress blog to HTTPS:

  1. Log in to your WordPress Dashboard
  2. Disable any cache plugins like WP Super Cache
  3. go to Settings/General
  4. Add an s after http to your website URL in the WordPress Address (URL) and Site Address (URL) boxes
  5. Click the Save Changes button at the bottom of the Settings page
  6. You will probably be logged out automatically at this stage (if not, log out) – log in again to the new https:// URL
  7. Go to Plugins/Add New
  8. In the Search Plugin box, type ‘velvet’, then hit enter
  9. Velvet Blues Update URLs‘ will show up near the top of the list
  10.  Click on the plugin name
  11.  In the window that pops up, click the Install Now button
  12.  The window will close and show you the Add Plugins page again. Click the Activate button next to ‘Velvet Blues Update URLs’
  13. You’re almost finished! Go to Tools/Update URLs
  14. Under Step 1, put your old http:// URL in the first box and your new https:// URL in the second box
  15. Under Step 2, check all of the checkboxes except the last one (IMPORTANT – do NOT check ‘Update ALL GUIDs’)
  16. Click the Update URLs Now button
  17. A little box will come up telling you how many changes were made
  18. Return to Plugins/Installed Plugins and deactivate ‘Velvet Blues Update URLs’. Once it is deactivated, you can delete it.
  19. This is optional, but I suggest you go the plugin’s page on WordPress.org and either leave them a nice review or donate a dollar or two (or both) since they just saved you from having to search all over your website for links that needed to be updated: 
  20. Visit Site to check everything is ok
  21. Turn your cache plugin back on (if you have one)

Yes, I know it is 21 steps but, really, it will take you a couple of minutes to do this. Just make sure you have that SSL certificate installed first.

Then you can rest easy that Google won’t penalize your blog for lack of security and you’ll be giving peace of mind to your blog visitors too!
[page_section textstyle=’dark’ ]

[thrive_headline_focus title=”What Do You Want To Do Today?” orientation=”center”]

[one_third_first]

[thrive_custom_box title=”Earn Enough To Give Up The Day Job” style=”dark” type=”color” color=”#ffffff” border=””]

give up the day job

I want to earn more than enough to give up the day job and improve my current lifestyle

[thrive_link color=’green’ link=’https://petercomeau.com/give-up-the-day-job/’ target=’_self’ size=’small’ align=’aligncenter’]Earn Enough To Give Up The Day Job[/thrive_link]

[/thrive_custom_box]

[/one_third_first]

[one_third]

[thrive_custom_box title=”How To Start A Home Business” style=”dark” type=”color” color=”#ffffff” border=””]

Start Home Business

I want to see how an online business works so I can learn how to do it from home

[thrive_link color=’green’ link=’https://petercomeau.com/kick-start-your-own-online-business/’ target=’_self’ size=’small’ align=’aligncenter’]Start An Online Business[/thrive_link]

[/thrive_custom_box]

[/one_third]

[one_third_last]

[thrive_custom_box title=”Grow My Online Business” style=”dark” type=”color” color=”#ffffff” border=””]

grow online business

I want to grow my existing online business so I can scale up and reach my income goals

[thrive_link color=’green’ link=’https://petercomeau.com/free-strategy-session/’ target=’_self’ size=’small’ align=’aligncenter’]Grow My Online Business[/thrive_link]

[/thrive_custom_box]

[/one_third_last]

[/page_section]

[page_section template=”1″ position=”default”][thrive_headline_focus title=”Check Out My Latest Posts” orientation=”center”][thrive_posts_gallery title=”” no_posts=”8″ filter=”recent”][/page_section]